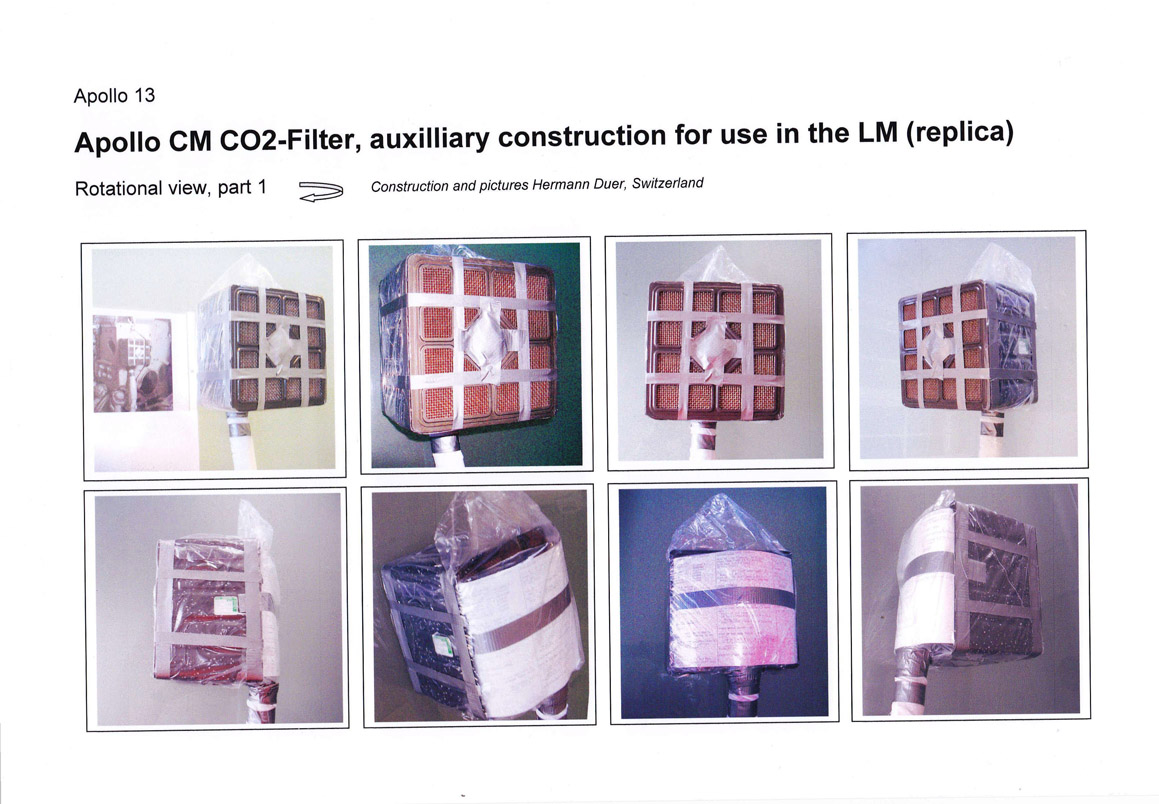
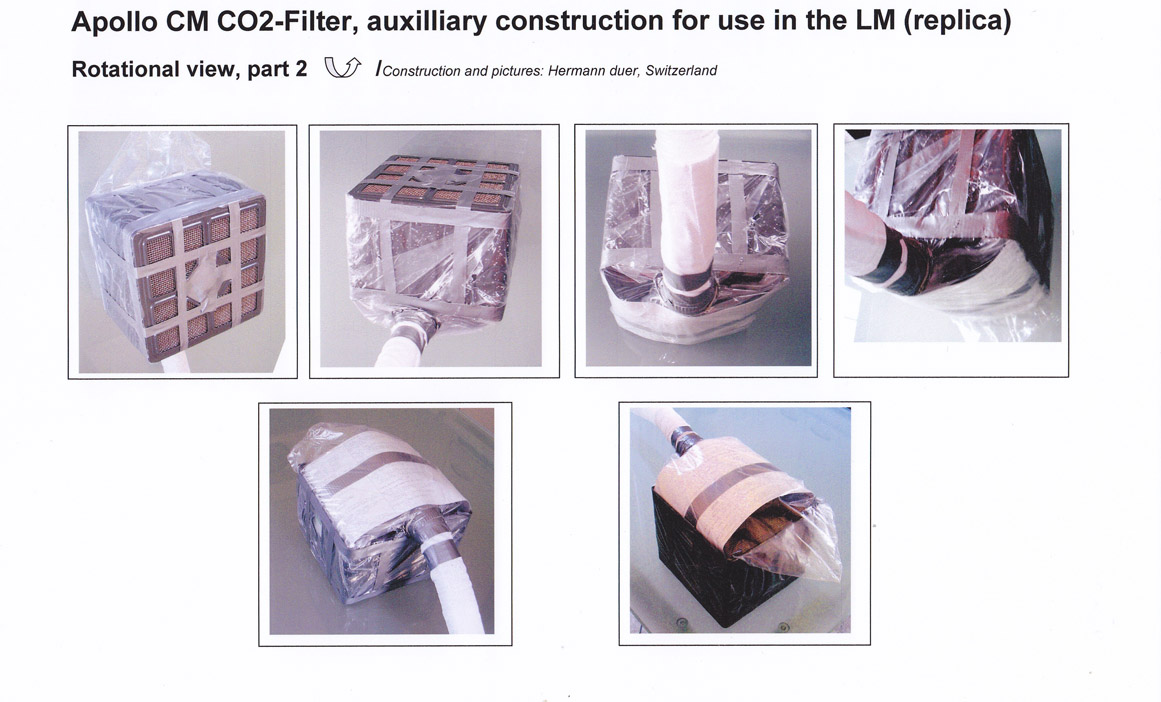
Step-by-Step
The transcript extract that follows comes from the Apollo 13
Technical Air-to-Ground Voice Transcript, starting with
PDF page 418 (document page 411). The transcript has been
checked and corrected using audio recording 420-AAA_Track-3,
starting 1 hour 26 minutes 06 seconds after the beginning of the
audio clip.
Times are given as "dd hh mm ss".
03 18 08 43 Kerwin: Okay, Jim. The way I thought it
might be best to do it would be to have you gather the equipment
and let us talk you through your procedure while you do it. Now,
maybe you could give Jack the headset and - and - get the
equipment together, and then we'll talk you through the
procedure. I think it'll be a little easier to do that way than
if you tried to copy it all down - and then go do it.
03 18 09 11 Lovell: Okay. Do you have any equipment
listed? I'll just get it and give it to him and I can just sit
here where I am.
03 18 09 17 Kerwin: Okay. I think the equipment you'll
need will be two command module lithium hydroxide canisters, a
roll of the gray tape, the two LCGs because we're going to
use the (plastic) bags from the LCGs, and one LM cue card - one of
those cardboard cue cards - which you will cut off about an inch
and a half out from the ring. Now, I think that's all we'll need.
Over. (Pause)
03 18 10 03 Lovell: Okay (garbled) Okay, Houston. (Long
Pause) Hello, Houston.
03 18 10 25 Kerwin: Go ahead, Jim.
03 18 10 28 Lovell: Okay. That's two lithium hydroxide
canisters, one roll of that special gray tape, two LCGs which
we're going to use the bags from, one LM cue card and (garbled)
03 18 10 53 Kerwin: Okay. That's affirmative, Jim. If
you'll just cut the cue card, which is a handy piece of stiff
paper the right size, about an inch and a half from the rings.
Just cut off the ring holes, in other words, and you'll have a
card about 11 inches long and probably 6 inches wide, something
like that.
03 18 11 19 Lovell: Okay, fine. I'll have Jack gather up
the stuff.
03 18 11 22 Kerwin: Okay.
[Jumping ahead to 1 hour 38 minutes 49
seconds after the start of the audio clip.]
03 18 21 26 Lovell: Okay, Houston; Aquarius.
03 18 21 32 Kerwin: Yes. Aquarius, Houston. Go ahead.
03 18 21 37 Lovell: We have gathered the material, and I
can put Jack on the headset and he can copy the instructions. Or
could I copy it to give them to him, or do you think they're too
detailed?
03 18 21 55 Kerwin: Why don't you put him on the headsets,
Jim, and I'll read it out to him.
03 18 22 02 Lovell: Okay. (Long Pause)
03 18 22 30 Swigert: Okay, Joe. I'm on.
03 18 22 33 Kerwin: Okay, Jack. Did anybody ever tell you
that you got a 60-day extension on (filing) your income tax. Over.
03 18 22 42 Swigert: Yeah. I think - I think somebody said
that when you are out of the country, you get a 60-day extension.
03 18 22 50 Kerwin: Okay; right. Okay. I'm ready to start
into the procedure. When you answer me back, speak up - speak up
into the microphone, because our downlink is pretty noisy. The
first thing we want you to do, and we'll do this on one canister,
and then let you go ahead and repeat it on the second. So take one
of the LCGs and cut off the outer bag by cutting along one the
heat seals. Do it carefully and close to the heat seal, because we
may have to use the outer bag if we damage the inner bag. So go
ahead and do that, and then we'll do the next step. (Pause)
03 18 23 37 Swigert: Okay. Take an LCG, cut the outer bag
by the heat seal. Be careful not to damage the inner bag. Right?
(Pause)
03 18 23 46 Kerwin: Right. Just cut along one side.
[Comm Break]
03 18 24 50 Swigert: Okay, Houston, Odyssey (the
name of the Apollo 13 Command Module) - (correcting himself) or
Aquarius. We've done that.
03 18 24 55 Kerwin: Okay, Jack. Now - now remove the inner
bag from the outer bag, and cut the inner bag, also, along one of
the heat seals down one side. (Pause)
03 18 25 15 Swigert: Okay. Remove the inner bag from the
outer bag, cut the inner bag along the heat seal along one side.
03 18 25 22 Kerwin: Okay. That's correct. Do that, and
report. (Long Pause)
03 18 26 20 Swigert: Okay, Joe. We've got that done.
03 18 26 22 Kerwin: Okay, Jack. Now you can put the LCG
itself; that is, take it out of the inner bag, put it in the outer
bag, and stow it some place; we recommend U-1, but you can stow it
wherever it's convenient.
03 18 26 40 Swigert: (Garbled) outer bag (garbled)
and re-stow it back in U-1. (Pause) Okay, Joe. We've got that.
03 18 26 50 Kerwin: Okay. Now pick up one of the lithium
hydroxide canisters, and let me describe which end is which. It's
approximately square on one - one of the vented flat ends, has the
strap, and that end we call the top, the end opposite we call the
bottom. Is that clear? Over.
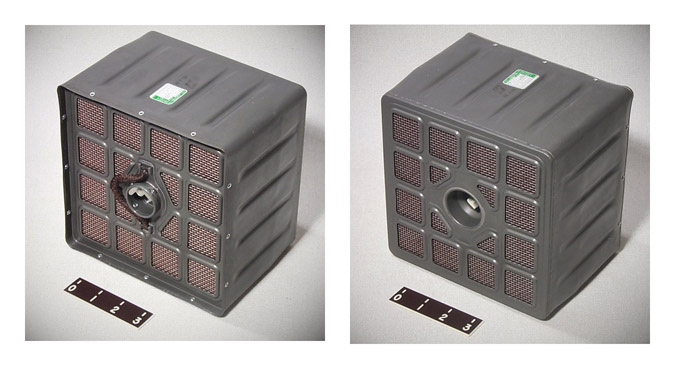
Command Module LiOH
Canister: "top" (left) and "bottom" (right).
Image downloaded from Historic
Space Systems.
(Click on the image for a larger version.)
|
03 18 27 37 Kerwin: Okay. Now then, we're - we want you to
take the tape and cut out two pieces about 3 feet long, or a good
arm's length, and what you're - what we want you to do with them
is to make two belts around the sides of the canister, one belt
near the top and one belt near the bottom, with the sticky side
out; wrap it around, sticky side out, as tight as possible. It'll
probably take both of you to get it nice and snug. Over.
03 18 30 01 Swigert: Okay, now … (Long Pause) Okay.
Now we've got to make the belt real taut here. (Pause)
03 18 30 23 Lovell: How's that?
03 18 30 35 Swigert: Real tight. And then (garbled)
bottom.
[Comm Break]
03 18 33 13 Swigert: Okay, Joe.
03 18 33 18 Kerwin: Okay, Jack. Did you have …
03 38 33 19 Swigert: … Hey, Houston. Are you reading?
03 18 33 24 Kerwin: Jack - -
03 18 33 25 Swigert: - - We've got the two belts around
the top and the one around the bottom all done.
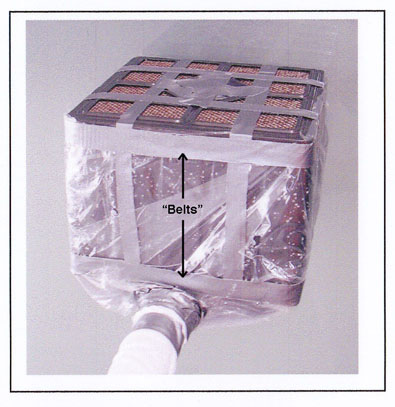
The locations of the
belts are indicated. At 03 18 49 20, after the inner
LCG bag has been put in place, Jack will add strips -
sticky side down - to the outside to secure the bag.
These outer strips obscure our view of the inner
belts. (Click on the image for a larger
version.)
|
03 18 34 15 Swigert: Yeah, Joe. Very good.
03 18 34 17 Kerwin: Okay. Press on.
03 18 34 22 Swigert: (To Lovell) Okay. I've got to cut
(garbled) right here and we'll tear it lengthwise in half; and I'm
going to go around right here at this ridge all the way around at
right angles and anchor this tape down. (Pause) Yeah.
03 18 34 46 Swigert: Joe, just to clarify that: sticky end
down? Right? On the tape that I am putting on now?
03 18 34 54 Kerwin: I didn't quite copy that, Jack. Say
again.
03 18 34 58 Swigert: Okay. That will be the sticky end
down on the container, right?
03 18 35 05 Kerwin: Oh, that's correct. I forgot to say
that. That's right. (Long Pause)
03 18 35 33 Swigert: (To Lovell) (Garbled) hold that one
right here (garbled) set it.
[Comm Break. Note that Joe did not tell Jack
that the two anchor tapes should be parallel to one another,
thereby keeping opposite ridges
on the top of the canister clear for installation of the
arch.]
02 18 37 28 Swigert: Okay, Joe; Aquarius. We've got that
done.
Anchor tape locations
labeled on the unit built on-board Aquarius. At
03 18 52 47,
after the bag and arch are in places, they will add four
strips of tape to secure the bag more snugly. Two
of these 'securing' tapes will go over the anchor taps
and the other two at right angles, one on either side of
the central hole. The fact that the vertical
'securing' tapes overlap the anchor tapes is
particularly evident near the bottom of the image.
(Click on the image for a larger version.)
|
03 18 37 32 Kerwin: Okay. Jack, the next step is to
get the EVA cue card and use it to form an arch over the top of
the canister; just tuck one short end under one ridge on the top
the other one against the ridge on the other side so that it forms
a rounded arch over the top of the canister. You see, Jack, what
we're going to do is slip the bag over this whole assembly and the
cue card will serve to keep the bag from being sucked down against
the screens. Over.
03 18 38 10 Swigert: Okay. I got the idea.
03 18 38 13 Kerwin: Okay. And when you've done that, to
hold the arch in place, just run a strip of tape across the sides
of the … (correcting himself) that is, across the top of the arch,
and anchor it down to the sticky strips along each side.
03 18 38 31 Swigert: Okay. I got the idea. Okay. Let me
just repeat
it here. Take a cue card, form an arch over the top, bringing it
under the sides here. When we're through, run a piece of tape from
the sides across the top of that to anchor to the other side.
03 18 38 51 Kerwin: That's correct.
03 18 38 56 Swigert: Okay. In work. (To Lovell) The top.
Across the top. (Garbled) Looks like you're going to have to cut
the cue card slightly. (Long Pause) Doesn't have to be real
(spelling is correct) exact all the way across. We can just take
the scissors and cut off the edge here. The only thing this does,
Jim, is prevent this (bag) from being sucked down into the
container. (Long Pause) (Garbled)
[Comm Break]
03 18 43 34 Swigert: Okay, Joe. We've got that arch built,
and it's all taped in securely.
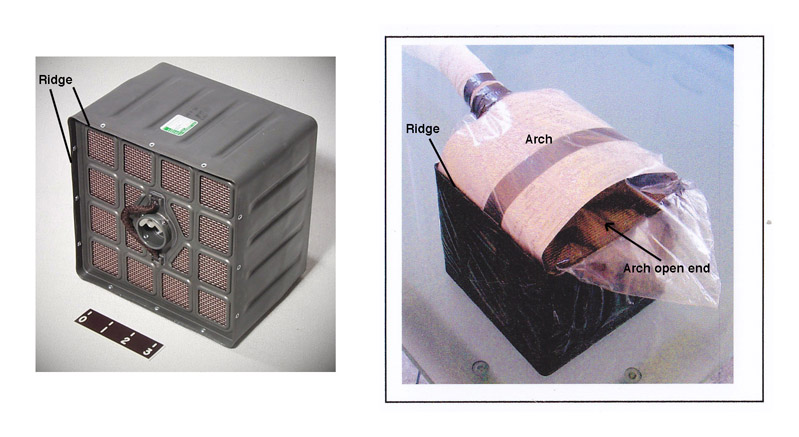
Installed arch on
the replica (right). The ridge that surrounds
the top of the canister is labeled on the replica and
an unmodified canister (left). (Click on the
image for a larger version.)
|
03 18 43 41 Kerwin: Okay, Jack. The next step is to stop
up the bypass hole,
which is the hole in the center of the bottom of the canister; we
want to stop that up because we don't want to bypass the flow; and
I forgot to tell you to get something to stick in that hole. We
recommend that you either use a wetwipe, or cut off a piece of
sock and stuff it in there, or you could probably even crumple up
some tape and use that. Over.
03 18 44 13 Swigert: Okay. We'll start plugging up the
bypass hole.
03 18 44 17 Kerwin: Okay.
03 18 44 18 Swigert: (To Lovell) Plug that hole. We can
either - we can put some - he says - Let's cut a piece of your
towel there.
03 18 44 27 Kerwin: Sounds good.
[Comm Break/ The audio clip is missing about
two minutes of the original recording. The next
transmission begins about about 2 hours 4 minutes 12 seconds
into the clip.]
03 18 47 14 Swigert: Okay, Houston; Aquarius. We
have the bypass hole all
plugged up.
03 18 47 21 Kerwin: Okay, Aquarius. The next step is take
the inner LCG bag that you cut open, and slip it over the top of
the canister, when you do that, orient it so that the ears of the
bag, that is, the corners should stick out on the closed end - are
oriented along the open ends of the arch, because we're going to
snip one of those corners to stick the hose in. Pull it down until
it fits snugly over the arch. Over.
03 18 47 56 Swigert: Okay, Joe. Slip the bag over the
canister so that the arch is at the bottom of the bag and that the
ears (after struggling to find the right words) would be at the
sides of the arch.
03 18 48 19 Kerwin: Depends on what you mean by sides.
Over the open ends of the arch.
03 18 48 26 Swigert: Right, the open ends of the arch.
03 18 48 28 Kerwin: Okay. (Long Pause)
03 18 49 17 Swigert: Okay, Joe. We've got that done.
03 18 49 20 Kerwin: Okay. Now
press the bag against the sticky belts that we put on the sides of
the canister. If there is any excess material, just kind of pleat
it, so that it makes a fairly tight seal, and then take another
3-foot strip of sticky tape and wrap it around the outside of the
bag opposite (that is, "over") the bottom sticky belt - to make a
nice tight seal.
03 18 49 50 Swigert: Okay. I'll do it. Okay. (To Lovell)
Now they want two strips around here to make a tight seal.
[Comm Break. In a labeled view of the
replica, note that the strip they are putting over the
bag at the bottom of the canister is on top of the two anchor
strips put on earlier. As they tell Joe next, they also put a
strip around the top of the canister. Jack's next
transmission starts 2 hours 10 minutes 28 seconds into the
clip.]
03 18 52 38 Swigert: Okay, Joe. We've got the canister
inside the bag, two strips around the sides of the bag, real
tight, and both sealed.
03 18 52 47 Kerwin: Okay; real
fine. Now there's probably a couple of inches of excess bag
sticking our around the bottom of the canister. To prevent this
from sucking in against the bottom screen, we'd like you to trim
it off with the scissors, and when you've done that, we'd like you
to cut two more strips of tape about 12 inches long or so, cut the
- tear them lengthwise to get four pieces 12 inches long and
1/2-inch wide, and then use those four strips to secure the bag by
passing the strips from the sides of the canister - outside the
bag - around the bottom of the canister and back up the
other side, and when you do this, just as you did on the top, make
them go outward of the hole and in between the screens. Over.
[In a detail
from AS13-62-8929, portions of the ragged edge of the bag left
behind by Jack's trimming are labeled.]
03 18 53 42 Swigert: Okay. You want me to trim the excess
material that's sticking off here; trim it at the edge of that
canister? Or do you want any excess left over?
03 18 53 52 Kerwin: No, you don't need to have any excess.
Just trim it approximately level.
03 18 53 59 Swigert: Okay. Let's do that first.
03 18 54 01 Kerwin: Okay. (Long Pause)
03 18 54 58 Swigert: Okay. Now, Joe, you want to cut four
strips, 12 inches long each, 1/2-inch in diameter. Tape that along
the outsides of the bag across the ribs.
03 18 55 15 Kerwin: That's correct, Jack. That's just for
additional security on the bag. When you get those done, you'll
have two strips going one way, and the other two will be
perpendicular to them.
[Comm Break. the next transmission starts 2 hours
16 minutes 39 seconds into the clip.]
03 18 57 58 Swigert: Okay, Houston; Aquarius. We've got
the four strips in
place.
03 18 58 03 Kerwin: Okay. We're in business now with the
bag, and the next step to perform is to get ready to put the red
suit hose - either the commander's or the LMP's because we're
going to want you to have both of these made up eventually - into
the top of the bag. And to do that you, first of all, have to
assure that the red hose is separated from the blue hose. I don't
know whether this has been done already, but if it hasn't, what
you have to do is cut the outer Beta-cloth sheath down the full
length of the hoses and then also cut the rubber ties that secure
the two hoses together, and the hoses should come apart and the
Comm cable should come off. Over.
03 18 59 04 Swigert: Okay. Take the - I'm going to
want to separate the red hose from the blue hose by cutting this
Beta-cloth sheath. Okay. That's in work.
03 18 59 15 Kerwin: Okay.
[Comm Break]
03 19 00 52 Swigert: Okay, Houston; Aquarius. I have the
LMP's red hose separated from the others.
03 19 01 00 Kerwin: Okay. Real fine. Now the next step is
to cut a diagonal hole in one ear of the plastic bag near the
arch. You can pick either one and cut about a 1-1/2 or 2 inch
diagonal hole, big enough to slip the red hose through. And when
you've done that, you'll just slip the red hose through so that it
goes about to the center of the canister. It's not critical except
that the opening should be down; and then tape the bag to the hose
where it goes in so that it's nice and snug. Over.
03 19 01 40 Swigert: Okay. Copy that. We want a 1-1/2 inch
hole right here at this ear, and put the hose in here, end down
and toward the canister; and then we tape the seal around here.
(Long Pause)
03 19 02 10 Swigert: Let's try it. (To Lovell and/or
Haise) We can always make it bigger if we have to. Fred, get those
(garbled). (Long Pause) Got to come in towards the center, all the
way to the center. No, no.
[Comm Break]
03 19 06 17 Swigert: (To Lovell and/or Haise) Yes. I can't
get those big knobs.
[Comm Break]
03 19 08 39 Swigert: (To Lovell and/or Haise) All
we have to do is (garbled) tape around here (garbled) tight fit.
(Garbled)
03 19 10 18 Swigert: Okay, Houston; Aquarius.
03 19 10 20 Kerwin: Aquarius, Houston. Go ahead.
03 19 10 26 Swigert: Okay. Our do-it-yourself lithium
hydroxide canister change is complete. Joe, the only thing
different is that our arch on this piece of cardboard is not big
enough to position the red hose with the inlet down. The
inlet to the red hose is lying on its side, but I think it'll
still work.
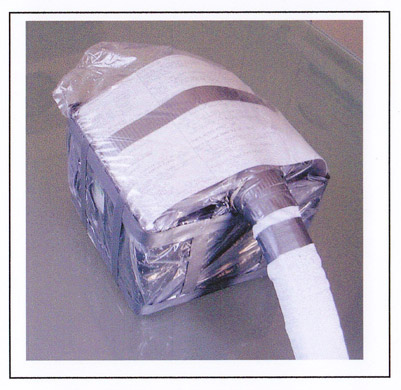
View of a hose
inserted through a slit in one 'ear' of the bag
on the replica, and then pushed in far enough to reach
the center of the canister. The bag material was
then taped securely around the hose. (Click on
the image for a larger version.)
|
03 19 11 17 Swigert: (To Kerwin) Okay. Will do. (To
Lovell) Jim, I've got one more little thing to do, and that's (to)
seal that (garbled). (Long Pause) (To Kerwin) Okay, Joe.
That's done.
03 19 12 30 Kerwin: Okay, Jack. Now the remaining steps
are simply suit-loop configuration steps to get this thing into
full operation; and our ECS people want to
hold off on that until the (LM LiOH) canister you're working on
gets to 7.6 millimeters of mercury, which will probably be another
45 minutes or an hour. We're reading 4.7 now. So what we'd like
you to do in the interim is to set up the second command module
canister the same way you just did the first one, using the
commander's hose, and get that all set and probably about that
time it'll be time to switch over.


